搭建Springboot+Shiro权限安全框架

1. 内容简介

主要讲解如何使用Spring Boot与Shiro进行整合使用,实现强大的用户权限管理,其中涉及如何完成用户认证(即用户登录),用户授权,thymeleaf页面整合shiro权限标签等知识点。

2. Spring Boot与Shiro框架简介

2.1 Spring Boot框架简介

Spring的诞生是 Java 企业版(Java Enterprise Edition,JEE,也称 J2EE)的
轻量级代替品。无需开发重量级的 Enterprise JavaBean(EJB),Spring 为企业级
Java 开发提供了一种相对简单的方法,通过依赖注入和面向切面编程,用简单的Java 对象(Plain Old Java Object,POJO)实现了 EJB 的功能。

虽然 Spring 的组件代码是轻量级的,但它的配置却是重量级的。

所有Spring配置都代表了开发时的损耗。 因为在思考 Spring 特性配置和解决业务问题之间需要进行思维切换,所以写配置挤占了写应用程序逻辑的时间。除此之外,项目的依赖管理也是件吃力不讨好的事情。决定项目里要用哪些库就已经够让人头痛的了,你还要知道这些库的哪个版本和其他库不会有冲突,这难题实在太棘手。并且,依赖管理也是一种损耗,添加依赖不是写应用程序代码。一旦选错了依赖的版本,随之而来的不兼容问题毫无疑问会是生产力杀手。

Spring Boot 让这一切成为了过去。
Spring Boot 简化了基于Spring的应用开发,只需要“run”就能创建一个独立的、生产级别的Spring应用。Spring Boot为Spring平台及第三方库提供开箱即用的设置(提供默认设置),这样我们就可以简单的开始。多数Spring Boot应用只需要很少的Spring配置。

我们可以使用SpringBoot创建java应用,并使用java –jar 启动它,或者采用传统的war部署方式。

Spring Boot 主要目标是:

  • 为所有 Spring 的开发提供一个从根本上更快的入门体验。
  • 开箱即用,但通过自己设置参数,即可快速摆脱这种方式。
  • 提供了一些大型项目中常见的非功能性特性,如内嵌服务器、安全、指标,健康检测、外部化配置等。
  • 绝对没有代码生成,也无需 XML 配置。

2.2 Shiro框架简介

Apache Shiro是一个强大且易用的Java安全框架,执行身份验证、授权、密码学和会话管理。使用Shiro的易于理解的API,您可以快速、轻松地获得任何应用程序,从最小的移动应用程序到最大的网络和企业应用程序。

Apache Shiro 体系结构

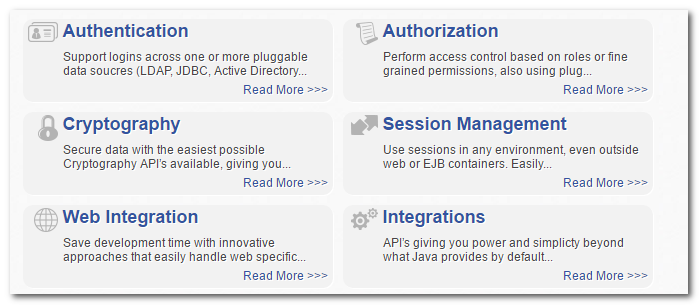
1、 Authentication 认证 —- 用户登录
2、 Authorization 授权 — 用户具有哪些权限
3、 Cryptography 安全数据加密
4、 Session Management 会话管理
5、 Web Integration web系统集成
6、 Interations 集成其它应用,spring、缓存框架

3. Spring Boot快速入门

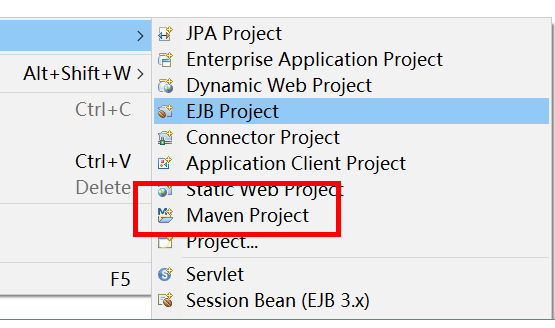
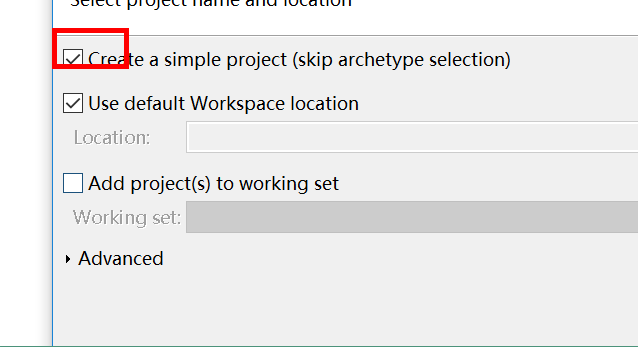
3.1. 建立Maven项目,导入spring boot父工程


  • 修改pom.xml:
    1
    2
    3
    4
    5
    6
    7
    8
    9
    10
    11
    12
    13
    14
    15
    16
    <project xmlns="http://maven.apache.org/POM/4.0.0" xmlns:xsi="http://www.w3.org/2001/XMLSchema-instance"
    xsi:schemaLocation="http://maven.apache.org/POM/4.0.0 http://maven.apache.org/xsd/maven-4.0.0.xsd">
    <modelVersion>4.0.0</modelVersion>

    <!-- 继承Spring Boot的默认父工程 -->
    <!-- Spring Boot 父工程 -->
    <parent>
    <groupId>org.springframework.boot</groupId>
    <artifactId>spring-boot-starter-parent</artifactId>
    <version>1.5.4.RELEASE</version>
    </parent>

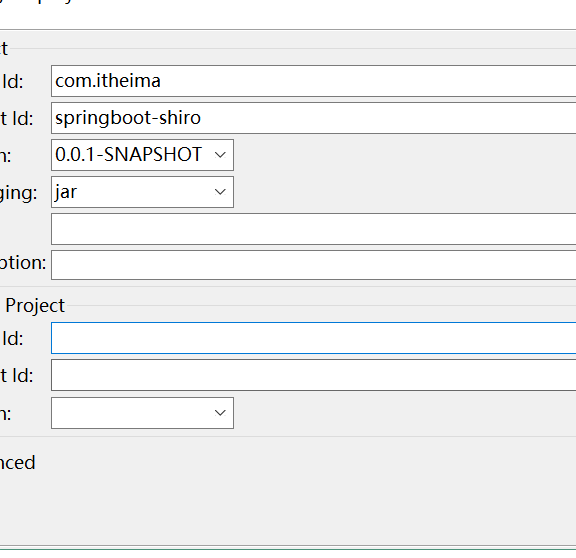
    <groupId>com.itheima</groupId>
    <artifactId>springboot-shiro</artifactId>
    <version>0.0.1-SNAPSHOT</version>
    </project>

3.2 导入web支持

1
2
3
4
5
6
7
8
9
<!-- 导入依赖 -->
<dependencies>
<!-- 导入web支持:SpringMVC开发支持,Servlet相关的程序 -->
<!-- web支持,SpringMVC, Servlet支持等 -->
<dependency>
<groupId>org.springframework.boot</groupId>
<artifactId>spring-boot-starter-web</artifactId>
</dependency>
</dependencies>

3.3. 编写测试Controller类

1
2
3
4
5
6
7
8
9
10
11
12
13
14
15
16
17
18
19
package com.itheima.controller;

import org.springframework.stereotype.Controller;
import org.springframework.web.bind.annotation.RequestMapping;
import org.springframework.web.bind.annotation.ResponseBody;

@Controller
public class UserController {

/**
* 测试方法
*/
@RequestMapping("/hello")
@ResponseBody
public String hello(){
System.out.println("UserController.hello()");
return "ok";
}
}

3.4. 编写SpringBoot启动类

1
2
3
4
5
6
7
8
9
10
11
12
13
14
15
16
17
package com.itheima;

import org.springframework.boot.SpringApplication;
import org.springframework.boot.autoconfigure.SpringBootApplication;

/**
* SpringBoot启动类
* @author lenovo
*
*/
@SpringBootApplication
public class Application {

public static void main(String[] args) {
SpringApplication.run(Application.class, args);
}
}

3.5. 导入thymeleaf页面模块

  • 引入thymeleaf依赖
1
2
3
4
5
<!-- 导入thymeleaf依赖 -->
<dependency>
<groupId>org.springframework.boot</groupId>
<artifactId>spring-boot-starter-thymeleaf</artifactId>
</dependency>
  • 在Controller添加测试方法

    1
    2
    3
    4
    5
    6
    7
    8
    9
    10
    /**
    * 测试thymeleaf
    */
    @RequestMapping("/testThymeleaf")
    public String testThymeleaf(Model model){
    //把数据存入model
    model.addAttribute("name", "黑马程序员");
    //返回test.html
    return "test";
    }
  • 建立test.html页面
    在src/main/resource目录下创建templates目录,然后创建test.html页面

    1
    2
    3
    4
    5
    6
    7
    8
    9
    10
    <!DOCTYPE html>
    <html>
    <head>
    <meta charset="UTF-8">
    <title>测试Thymeleaf的使用</title>
    </head>
    <body>
    <h3 th:text="${name}"></h3>
    </body>
    </html>

    在thymeleaf3.0以前对页面标签语法要求比较严格,开始标签必须有对应的结束标签。

如果希望页面语法不严谨,但是也能够运行成功,可以把thymeleaf升级为3.0或以上版本。

升级thymeleaf3.0.2版本:

1
2
3
4
5
6
7
8
<!-- 修改参数 -->
<properties>
<!-- 修改JDK的编译版本为1.8 -->
<java.version>1.8</java.version>
<!-- 修改thymeleaf的版本 -->
<thymeleaf.version>3.0.2.RELEASE</thymeleaf.version>
<thymeleaf-layout-dialect.version>2.0.4</thymeleaf-layout-dialect.version>
</properties>

4. Spring Boot与Shiro整合实现用户认证

4.1分析Shiro的核心API

Subject: 用户主体(把操作交给SecurityManager)
SecurityManager:安全管理器(关联Realm)
Realm:Shiro连接数据的桥梁

4.2. Spring Boot整合Shiro

4.2.1. 导入shiro与spring整合依赖

修改pom.xml

1
2
3
4
5
6
<!-- shiro与spring整合依赖 -->
<dependency>
<groupId>org.apache.shiro</groupId>
<artifactId>shiro-spring</artifactId>
<version>1.4.0</version>
</dependency>

4.2.2 自定义Realm类

1
2
3
4
5
6
7
8
9
10
11
12
13
14
15
16
17
18
19
20
21
22
23
24
25
26
27
28
29
30
31
32
33
34
35
package com.itheima.shiro;

import org.apache.shiro.authc.AuthenticationException;
import org.apache.shiro.authc.AuthenticationInfo;
import org.apache.shiro.authc.AuthenticationToken;
import org.apache.shiro.authz.AuthorizationInfo;
import org.apache.shiro.realm.AuthorizingRealm;
import org.apache.shiro.subject.PrincipalCollection;

/**
* 自定义Realm
* @author lenovo
*
*/
public class UserRealm extends AuthorizingRealm{

/**
* 执行授权逻辑
*/
@Override
protected AuthorizationInfo doGetAuthorizationInfo(PrincipalCollection arg0) {
System.out.println("执行授权逻辑");
return null;
}

/**
* 执行认证逻辑
*/
@Override
protected AuthenticationInfo doGetAuthenticationInfo(AuthenticationToken arg0) throws AuthenticationException {
System.out.println("执行认证逻辑");
return null;
}

}

4.2.3 编写Shiro配置类(*)

1
2
3
4
5
6
7
8
9
10
11
12
13
14
15
16
17
18
19
20
21
22
23
24
25
26
27
28
29
30
31
32
33
34
35
36
37
38
39
40
41
42
43
44
45
46
47
48
package com.itheima.shiro;

import org.apache.shiro.spring.web.ShiroFilterFactoryBean;
import org.apache.shiro.web.mgt.DefaultWebSecurityManager;
import org.springframework.beans.factory.annotation.Qualifier;
import org.springframework.context.annotation.Bean;
import org.springframework.context.annotation.Configuration;

/**
* Shiro的配置类
* @author lenovo
*
*/
@Configuration
public class ShiroConfig {

/**
* 创建ShiroFilterFactoryBean
*/
@Bean
public ShiroFilterFactoryBean getShiroFilterFactoryBean(@Qualifier("securityManager")DefaultWebSecurityManager securityManager){
ShiroFilterFactoryBean shiroFilterFactoryBean = new ShiroFilterFactoryBean();

//设置安全管理器
shiroFilterFactoryBean.setSecurityManager(securityManager);

return shiroFilterFactoryBean;
}

/**
* 创建DefaultWebSecurityManager
*/
@Bean(name="securityManager")
public DefaultWebSecurityManager getDefaultWebSecurityManager(@Qualifier("userRealm")UserRealm userRealm){
DefaultWebSecurityManager securityManager = new DefaultWebSecurityManager();
//关联realm
securityManager.setRealm(userRealm);
return securityManager;
}

/**
* 创建Realm
*/
@Bean(name="userRealm")
public UserRealm getRealm(){
return new UserRealm();
}
}

4.3 使用Shiro内置过滤器实现页面拦截

1
2
3
4
5
6
7
8
9
10
11
12
13
14
15
16
17
18
19
20
21
22
23
24
25
26
27
28
29
30
31
32
33
34
35
36
37
38
39
40
41
42
43
44
45
46
47
48
49
50
51
52
53
54
55
56
57
58
59
60
61
62
63
64
65
66
67
68
69
70
71
72
73
74
75
package com.itheima.shiro;

import java.util.LinkedHashMap;
import java.util.Map;

import org.apache.shiro.spring.web.ShiroFilterFactoryBean;
import org.apache.shiro.web.mgt.DefaultWebSecurityManager;
import org.springframework.beans.factory.annotation.Qualifier;
import org.springframework.context.annotation.Bean;
import org.springframework.context.annotation.Configuration;

/**
* Shiro的配置类
* @author lenovo
*
*/
@Configuration
public class ShiroConfig {

/**
* 创建ShiroFilterFactoryBean
*/
@Bean
public ShiroFilterFactoryBean getShiroFilterFactoryBean(@Qualifier("securityManager")DefaultWebSecurityManager securityManager){
ShiroFilterFactoryBean shiroFilterFactoryBean = new ShiroFilterFactoryBean();

//设置安全管理器
shiroFilterFactoryBean.setSecurityManager(securityManager);

//添加Shiro内置过滤器
/**
* Shiro内置过滤器,可以实现权限相关的拦截器
* 常用的过滤器:
* anon: 无需认证(登录)可以访问
* authc: 必须认证才可以访问
* user: 如果使用rememberMe的功能可以直接访问
* perms: 该资源必须得到资源权限才可以访问
* role: 该资源必须得到角色权限才可以访问
*/
Map<String,String> filterMap = new LinkedHashMap<String,String>();
/*filterMap.put("/add", "authc");
filterMap.put("/update", "authc");*/

filterMap.put("/testThymeleaf", "anon");

filterMap.put("/*", "authc");

//修改调整的登录页面
shiroFilterFactoryBean.setLoginUrl("/toLogin");

shiroFilterFactoryBean.setFilterChainDefinitionMap(filterMap);


return shiroFilterFactoryBean;
}

/**
* 创建DefaultWebSecurityManager
*/
@Bean(name="securityManager")
public DefaultWebSecurityManager getDefaultWebSecurityManager(@Qualifier("userRealm")UserRealm userRealm){
DefaultWebSecurityManager securityManager = new DefaultWebSecurityManager();
//关联realm
securityManager.setRealm(userRealm);
return securityManager;
}

/**
* 创建Realm
*/
@Bean(name="userRealm")
public UserRealm getRealm(){
return new UserRealm();
}
}

4.4 实现用户认证(登录)操作

4.4.1 设计登录页面

1
2
3
4
5
6
7
8
9
10
11
12
13
14
15
16
17
18
19
20
21
22
23
24
25
26
27
28
29
30
31
32
33
| 

<!DOCTYPE html>

<html>

<head>

<meta charset=_"UTF-8"_>

<title>登录页面</title>

</head>

<body>

<h3>登录</h3>

<form method=_"post"_ action=_"login"_>

用户名:<input type=_"text"_ name=_"name"_/><br/>

密码:<input type=_"password"_ name=_"password"_/><br/>

<input type=_"submit"_ value=_"__登录"_/>

</form>

</body>

</html>

|

4.4.2 编写Controller的登录逻辑

1
2
3
4
5
6
7
8
9
10
11
12
13
14
15
16
17
18
19
20
21
22
23
24
25
26
27
28
29
30
31
32
33
34
35

/**
* 登录逻辑处理
*/
@RequestMapping("/login")
public String login(String name,String password,Model model){

/**
* 使用Shiro编写认证操作
*/
//1.获取Subject
Subject subject = SecurityUtils.getSubject();

//2.封装用户数据
UsernamePasswordToken token = new UsernamePasswordToken(name,password);

//3.执行登录方法
try {
subject.login(token);

//登录成功
//跳转到test.html
return "redirect:/testThymeleaf";
} catch (UnknownAccountException e) {
//e.printStackTrace();
//登录失败:用户名不存在
model.addAttribute("msg", "用户名不存在");
return "login";
}catch (IncorrectCredentialsException e) {
//e.printStackTrace();
//登录失败:密码错误
model.addAttribute("msg", "密码错误");
return "login";
}
}

4.4.3. 编写Realm的判断逻辑

1
2
3
4
5
6
7
8
9
10
11
12
13
14
15
16
17
18
19
20
21
22
23
24
25
26
27
28
29
30
31
32
33
34
35
36
37
38
39
40
41
42
43
44
45
46
47
48
49
50
51
package com.itheima.shiro;

import org.apache.shiro.authc.AuthenticationException;
import org.apache.shiro.authc.AuthenticationInfo;
import org.apache.shiro.authc.AuthenticationToken;
import org.apache.shiro.authc.SimpleAuthenticationInfo;
import org.apache.shiro.authc.UsernamePasswordToken;
import org.apache.shiro.authz.AuthorizationInfo;
import org.apache.shiro.realm.AuthorizingRealm;
import org.apache.shiro.subject.PrincipalCollection;

/**
* 自定义Realm
* @author lenovo
*
*/
public class UserRealm extends AuthorizingRealm{

/**
* 执行授权逻辑
*/
@Override
protected AuthorizationInfo doGetAuthorizationInfo(PrincipalCollection arg0) {
System.out.println("执行授权逻辑");
return null;
}

/**
* 执行认证逻辑
*/
@Override
protected AuthenticationInfo doGetAuthenticationInfo(AuthenticationToken arg0) throws AuthenticationException {
System.out.println("执行认证逻辑");

//假设数据库的用户名和密码
String name = "eric";
String password = "123456";

//编写shiro判断逻辑,判断用户名和密码
//1.判断用户名
UsernamePasswordToken token = (UsernamePasswordToken)arg0;
if(!token.getUsername().equals(name)){
//用户名不存在
return null;//shiro底层会抛出UnKnowAccountException
}

//2.判断密码
return new SimpleAuthenticationInfo("",password,"");
}

}

4.5 整合MyBatis实现登录

4.5.1 导入mybatis相关的依赖

1
2
3
4
5
6
7
8
9
10
11
12
13
14
15
16
17
<!-- 导入mybatis相关的依赖 -->
<dependency>
<groupId>com.alibaba</groupId>
<artifactId>druid</artifactId>
<version>1.0.9</version>
</dependency>
<!-- mysql -->
<dependency>
<groupId>mysql</groupId>
<artifactId>mysql-connector-java</artifactId>
</dependency>
<!-- SpringBoot的Mybatis启动器 -->
<dependency>
<groupId>org.mybatis.spring.boot</groupId>
<artifactId>mybatis-spring-boot-starter</artifactId>
<version>1.1.1</version>
</dependency>

4.5.2 配置application.properties

位置:src/main/resources目录下

1
2
3
4
5
6
7
8
9
10
11
spring.datasource.driverClassName=com.mysql.jdbc.Driver

spring.datasource.url=jdbc:mysql://localhost:3306/test

spring.datasource.username=root

spring.datasource.password=root

spring.datasource.type=com.alibaba.druid.pool.DruidDataSource

mybatis.type-aliases-package=com.itheima.domain

4.5.3 编写User实体

1
2
3
4
5
6
7
8
9
10
11
12
13
14
15
16
17
18
19
20
21
22
23
24
25
26
package com.itheima.domain;

public class User {
private Integer id;
private String name;
private String password;
public Integer getId() {
return id;
}
public void setId(Integer id) {
this.id = id;
}
public String getName() {
return name;
}
public void setName(String name) {
this.name = name;
}
public String getPassword() {
return password;
}
public void setPassword(String password) {
this.password = password;
}

}

4.5.4. 编写UserMapper接口

1
2
3
4
5
6
7
8
package com.itheima.mapper;

import com.itheima.domain.User;

public interface UserMapper {

public User findByName(String name);
}

4.5.5. 编写UserMapper.xml映射文件

1
2
3
4
5
6
7
8
9
10
11
12
13
14
15
<?xml version="1.0" encoding="UTF-8" ?>
<!DOCTYPE mapper
PUBLIC "-//mybatis.org//DTD Mapper 3.0//EN"
"http://mybatis.org/dtd/mybatis-3-mapper.dtd">
<!-- 该文件存放CRUD的sql语句 -->
<mapper namespace="com.itheima.mapper.UserMapper">

<select id="findByName" parameterType="string" resultType="user">
SELECT id,
NAME,
PASSWORD
FROM
user where name = #{value}
</select>
</mapper>

4.5.6. 编写业务接口和实现

  • 接口

    1
    2
    3
    4
    5
    6
    7
    8
    package com.itheima.service;

    import com.itheima.domain.User;

    public interface UserService {

    public User findByName(String name);
    }
  • 实现

    1
    2
    3
    4
    5
    6
    7
    8
    9
    10
    11
    12
    13
    14
    15
    16
    17
    18
    19
    20
    21
    22
    23
    package com.itheima.service.impl;

    import org.springframework.beans.factory.annotation.Autowired;
    import org.springframework.stereotype.Service;

    import com.itheima.domain.User;
    import com.itheima.mapper.UserMapper;
    import com.itheima.service.UserService;

    @Service
    public class UserServiceImpl implements UserService{

    //注入Mapper接口
    @Autowired
    private UserMapper userMapper;

    @Override
    public User findByName(String name) {
    return userMapper.findByName(name);
    }


    }

4.5.7. 添加@MapperScan注解

1
2
3
4
5
6
7
8
9
10
11
12
13
14
15
16
17
18
19
package com.itheima;

import org.mybatis.spring.annotation.MapperScan;
import org.springframework.boot.SpringApplication;
import org.springframework.boot.autoconfigure.SpringBootApplication;

/**
* SpringBoot启动类
* @author lenovo
*
*/
@SpringBootApplication
@MapperScan("com.itheima.mapper")
public class Application {

public static void main(String[] args) {
SpringApplication.run(Application.class, args);
}
}

4.5.8. 修改UserRealm

1
2
3
4
5
6
7
8
9
10
11
12
13
14
15
16
17
18
19
20
21
22
23
24
25
26
27
28
29
30
31
32
33
34
35
36
37
38
39
40
41
42
43
44
45
46
47
48
49
50
51
52
53
54
55
56
57
package com.itheima.shiro;

import org.apache.shiro.authc.AuthenticationException;
import org.apache.shiro.authc.AuthenticationInfo;
import org.apache.shiro.authc.AuthenticationToken;
import org.apache.shiro.authc.SimpleAuthenticationInfo;
import org.apache.shiro.authc.UsernamePasswordToken;
import org.apache.shiro.authz.AuthorizationInfo;
import org.apache.shiro.realm.AuthorizingRealm;
import org.apache.shiro.subject.PrincipalCollection;
import org.springframework.beans.factory.annotation.Autowired;

import com.itheima.domain.User;
import com.itheima.service.UserService;

/**
* 自定义Realm
* @author lenovo
*
*/
public class UserRealm extends AuthorizingRealm{

/**
* 执行授权逻辑
*/
@Override
protected AuthorizationInfo doGetAuthorizationInfo(PrincipalCollection arg0) {
System.out.println("执行授权逻辑");
return null;
}

@Autowired
private UserService userSerivce;

/**
* 执行认证逻辑
*/
@Override
protected AuthenticationInfo doGetAuthenticationInfo(AuthenticationToken arg0) throws AuthenticationException {
System.out.println("执行认证逻辑");

//编写shiro判断逻辑,判断用户名和密码
//1.判断用户名
UsernamePasswordToken token = (UsernamePasswordToken)arg0;

User user = userSerivce.findByName(token.getUsername());

if(user==null){
//用户名不存在
return null;//shiro底层会抛出UnKnowAccountException
}

//2.判断密码
return new SimpleAuthenticationInfo("",user.getPassword(),"");
}

}

5. Spring Boot与Shiro整合实现用户授权

5.1. 使用Shiro内置过滤器拦截资源

1
2
3
4
5
6
7
8
9
10
11
12
13
14
15
16
17
18
19
20
21
22
23
24
25
26
27
28
29
30
31
32
33
34
35
36
37
38
39
40
41
42
43
44
/**
* 创建ShiroFilterFactoryBean
*/
@Bean
public ShiroFilterFactoryBean getShiroFilterFactoryBean(@Qualifier("securityManager")DefaultWebSecurityManager securityManager){
ShiroFilterFactoryBean shiroFilterFactoryBean = new ShiroFilterFactoryBean();

//设置安全管理器
shiroFilterFactoryBean.setSecurityManager(securityManager);

//添加Shiro内置过滤器
/**
* Shiro内置过滤器,可以实现权限相关的拦截器
* 常用的过滤器:
* anon: 无需认证(登录)可以访问
* authc: 必须认证才可以访问
* user: 如果使用rememberMe的功能可以直接访问
* perms: 该资源必须得到资源权限才可以访问
* role: 该资源必须得到角色权限才可以访问
*/
Map<String,String> filterMap = new LinkedHashMap<String,String>();
/*filterMap.put("/add", "authc");
filterMap.put("/update", "authc");*/

filterMap.put("/testThymeleaf", "anon");
//放行login.html页面
filterMap.put("/login", "anon");

//授权过滤器
//注意:当前授权拦截后,shiro会自动跳转到未授权页面
filterMap.put("/add", "perms[user:add]");

filterMap.put("/*", "authc");

//修改调整的登录页面
shiroFilterFactoryBean.setLoginUrl("/toLogin");
//设置未授权提示页面
shiroFilterFactoryBean.setUnauthorizedUrl("/noAuth");

shiroFilterFactoryBean.setFilterChainDefinitionMap(filterMap);


return shiroFilterFactoryBean;
}

5.2. 完成Shiro的资源授权

UserRealm:

1
2
3
4
5
6
7
8
9
10
11
12
13
14
15
/**
* 执行授权逻辑
*/
@Override
protected AuthorizationInfo doGetAuthorizationInfo(PrincipalCollection arg0) {
System.out.println("执行授权逻辑");

//给资源进行授权
SimpleAuthorizationInfo info = new SimpleAuthorizationInfo();

//添加资源的授权字符串
info.addStringPermission("user:add");

return info;
}

thymeleaf和shiro标签整合使用

6.1. 导入thymeleaf扩展坐标

1
2
3
4
5
6
<!-- thymel对shiro的扩展坐标 -->
<dependency>
<groupId>com.github.theborakompanioni</groupId>
<artifactId>thymeleaf-extras-shiro</artifactId>
<version>2.0.0</version>
</dependency>

6.2. 配置ShiroDialect

在ShiroConfig类里面添加getShiroDialect方法

1
2
3
4
5
6
7
/**
* 配置ShiroDialect,用于thymeleaf和shiro标签配合使用
*/
@Bean
public ShiroDialect getShiroDialect(){
return new ShiroDialect();
}

6.3. 在页面上使用shiro标签

1
2
3
4
5
6
7
8
9
10
11
12
13
14
15
16
17
18
19
<!DOCTYPE html>
<html>
<head>
<meta charset="UTF-8">
<title>测试Thymeleaf的使用</title>
</head>
<body>
<h3 th:text="${name}"></h3>

<hr/>
<div shiro:hasPermission="user:add">
进入用户添加功能: <a href="add">用户添加</a><br/>
</div>
<div shiro:hasPermission="user:update">
进入用户更新功能: <a href="update">用户更新</a><br/>
</div>
<a href="toLogin">登录</a>
</body>
</html>

Over Ending(结束语)

SpringBoot+Shiro安全框架配置告一段落,其余的Shiro安全框架内容自行配置,自己去探索吧!

注:

如果还有不了解的,可以在右下方与博主在线沟通

-------------本文结束感谢您的阅读-------------

本文标题:搭建Springboot+Shiro权限安全框架

文章作者:Jason

发布时间:2019年06月23日 - 01:06

最后更新:2019年12月28日 - 22:12

原始链接:https://jasonssun.github.io/2019/06/23/搭建Springboot-Shiro权限安全框架/

许可协议: 署名-非商业性使用-禁止演绎 4.0 国际 转载请保留原文链接及作者。